Thursday, August 30, 2012

Single Ornament

Today's card has a single ornament on it.  I am OK with this card, but sort of think it needs something.  I may try adding some glitter or Cherry Cobbler Dazzling Details to it.  This was another card made on "play day" so again, so Stampin' Up! designer paper, but I do love the paper on this one. 

The ornament is from the Ornament Keepsake stamp set. 
 I stamped it twice---once in the red and once in the Gumball Green.  I cut out the red part of the ornament and glued it to the green part.  Then I'd like to say I die cut it using my Holiday Ornaments die, but I could not find this particular die anywhere.  I searched the stamp room top to bottom---quite a feat if you could see all the clutter in there--but could not find it.  I was hoping I didn't accidentally toss it in the garbage.  Could not find it, so I cut the ornament out by hand.
I have to stop here and brag on SU!!  I called them to see if I could buy just one of the dies in the set, since I had the whole set minus this one die.  NO, they don't do that, demonstrator support said--sell you an individual die.  But they WOULD send me just this one die as a courtesy because I had the set and could not find this one!! I was beside myself because this is my favorite die in the whole set!  Wasn't that nice of SU!!!

I'm a happy girl!!  Hope you like this card!!  Smiles, Laura

Tuesday, August 28, 2012

December 25

My friend Judy and I had another "play day" the other day and made a few cards I'll be showing you. We work well together.  We both have TONS of designer paper and are always wanting to use up some of it!

I used 3 different pieces of designer paper on this one.  It's not Stampin' Up! but the cardstock all is.  I saw this layout somewhere and thought it would be a fun one to use for this card.  The card is Riding Hood Red and the designer sheets are backed with Gumball Green cardstock.

The "December 25" is from the new Joyous Celebrations set.  I am pleased with this one.  It was fairly quick to make.  Quick is good!

Smiles, Laura

Sunday, August 26, 2012

Bootiful Occasions

There is a stamp set in the Stampin' Up! catalog that I overlooked until I started seeing great samples made by other stampers made using it.  It's Bootiful Occasions.  I'll be sharing MORE cards made using this set.  Love it.  I'm glad I saw other girls' samples to make me notice this set!  

This card is Tangerine Tango, faced with Elegant Eggplant.  I ran the eggplant card stock through the Big Shot using the Spider Web embossing folder.

This card used the witch's boot in the Bootiful set.  All 4 boots in the set have sentiments attached below the boot.  I cut mine separately so I can use them separately.  So for this card, I stamped the sentiment on one piece of white card stock and cut it out using the Apothecary Accents Framelit die and stamped the boot on another piece of card  stock and cut it out. 
 
Behind the sheet with the sentiment, I used striped paper from the Howlstooth & Scaringbone series.  I overlayed two ribbons.  These are the Dotted Scalloped Ribbon, but I turned the dots down, so the solid back of the ribbon shows.


Brads added to the white sentiment sheet completes the card.  Yes, hard to believe it's time to start thinking about Halloween.  But it is.  You'll see more Halloween cards here later....

Thanks for stopping by today!! Smiles, Laura


Friday, August 24, 2012

Inspired by Connie....

The card I'm sharing today was inspired by a wonderful designer, Connie Babbert.  No, mine isn't exactly like hers, but her card inspired me.  

This card is Cherry Cobbler with Whisper White on the front.  I used the Northern Flurry embossing folder on the white.

The designer paper on the front is Snow Festival series.  I stamped the little bird from the For The Birds set on Crumb Cake and colored him.  I cut the image out using a die in the Apothecary Accents Framelit set.  I didn't want to put brads on each side of it, so I punched out little Christmas trees using the new Merry Minis Punch Pack.  I wanted the tree to "pop" so I added  Dazzling Details Glimmer Adhesive on each tree.  I popped up the trees with dimensionals so that the stand out more---and the glitter helps
The ribbons hanging from it also add dimension.

Hope you like this one!!  See you soon!!  Smiles, Laura

Wednesday, August 22, 2012

Fall and Christmas....

My topic today is "Fall and Christmas" because I wanted to show you a card I made recently.  My class made it and said this would also be a fun layout for a Christmas card.  So I came home and made another one, only with a Christmas theme.

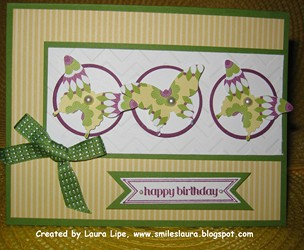
This first one is sort of fall-ish---or for any time.  Here is the front of it.
                                                     

The starfruit lacy circle is cut using the Delicate Doilies Sizzlit L die and is layered on the Island Indigo circle.Elegant Butterfly Punch.

So here is the inside of the card.  


To make it, start with 8.5” x 8.5” card stock.  Score 2-1/8” from all 4 sides.  Cut out all 4 corners then fold sides in to make square.  Face the front of the sides with DSP of your choice.

I used the following supplies on this card.
Stamp set: Thoughts and Prayers, Papillon Potpourri, Blessings from Heaven (inside)
CS:  Island Indigo, Summer Starfruit, Whisper White
Ink:  Island Indigo, Cajun Craze
Accessories: Comfort Café DSP, Delicate Doilies Sizzlit L Die, 3” Circle Originals, 2” circle die (non-SU), 


So here is the Christmas one I made.  For the front I used largest die from the Holiday Ornaments set with Lucky Limeade card stock.  I used Cherry card stock to punch using the Ornament punch.  Then I layered a circle punched from the Silver Glimmer paper.  I stamped a design from the Circles Circus stamp set, colored it in, and punched it with a smaller circle.  "Happy Christmas" is from the More Merry Messages set.

Here is the inside of the Christmas sample:  The ornament is from the Ornament Keepsakes set and the sentiment is from the More Merry Messages set.
 The designer paper used on this card is from the Snow Festival series.
So you can see we can use this layout to make many types of cards.  I love finding a fun fold that I can use many ways.

Stop by to see me often.  And remember I'd LOVE to get comments on my blog from you!!
Smiles, Laura

Tuesday, August 21, 2012

School's started.....


 I recently had a wonderful trip to Isle of Palms, SC, with my two grandchildren to visit with my sister Becky and her two grandchildren.  We had a great time while there.  I should have taken alot of pictures, but honestly I was busy being "in the moment" rather than capturing the moment.  One evening we all decide to make tie-dyed t-shirts.  Here are the kids in theirs.  Becky and I try to get these 4 kids together every year or so and they always have fun.
 Anyway, after we got home it was just a week or so before school started.  I like to make special cards to send to Dillon and Jessica as they start school each year.  Here are their cards I made this year.

Jessica's:
Jessica is going into 6th grade, but she'll be at the same school.  Her county has a 5th-6th school for her grade.

Dillon's:
 Inside of Dillon's.
Dillon is going into high school, 9th grade, so a big change for him, but he's up to it.  

Both kids are straight-A students.  And both of them went on mission trips (to different locations) with their church this year.  What an awesome summer they had!!  We are so proud of them!!  I hope they like their cards and have a wonderful school year!!
Smiles, Laura


Monday, August 20, 2012

More Perfectly Preserved.....

Yes, you get another sample using the Perfectly Preserved set.  I told you I love this set.  I decided this time to use the flowers from the set in the jar.  This looks like a great fall card to me, and I can sure see fall in the air.  No, I don't think it's because school is starting back.  I can actually see the days getting shorter!  And I'm ready for some cooler and drier air!!

The card is uses the following supplies:  
Stamp sets: Perfectly Preserved, Friendship Preserves
CS:  Soft Suede, Cajun Craze, Very Vanilla, Summer Starfruit
Ink:  Old Olive, Early Espresso, Summer Starfruit, Cajun Craze
Accessories: Comfort Café designer paper, Window Frames Collection Dies 
                                                       
I love the Comfort Cafe paper and think some sheets of it would look good on a Christmas card.  More on that at a later date.

I tried to color the jar just a bit so it show up---more than just plain--sort of like one of the older tinted jars.  Here is another card, same layout, using non-SU paper. The color of the photograph isn't as good on this one, but you can tell I used blue for the flowers and the jar is tented blue.  

The label on both jars uses "HELLO" from the Friendship Preserves stamp set.

Stop in again to see me real soon!! Smiles, Laura

Sunday, August 19, 2012

Welcome, Sydney!!

I have a new grandniece!  My nephew Warren adopted his wife's daughter Sydney recently and we are all so thrilled to have her in our family--officially and forever!!  Sydney is a darling girl, so friendly and bright and bubbly!  My sister is going to sure enjoy this new granddaughter.  Here is a picture of the family with the judge who signed the adoption papers.

And here is my nephew with his new daughter:

I wanted to make Sydney a card welcoming her to our family.  Here is the Hello Kitty card I made her.  All little girls love Hello, Kitty, don't they???   I used white card stock and faced it with Rose Red and topped that with Pretty in Pink.  I added some small Rose flowers.  
It was so worth the wait to have Sydney officially in the family, so I used this sentiment from the Word Play set.  I hope Sydney liked her card!!
Smiles, Laura

Saturday, August 18, 2012

Another Perfectly Preserved...

The card I'm sharing today used the Perfectly Preserved stamp set and let me tell you, this is now my favorite set, along with the dies that go with it.  I have had so much fun playing with the set and dies.  This card has the ear of corn in it.  I colored the corn using markers so I could get the two colors--yellow and green.  I stamped one ear of corn on a Post-It note, so I could mask my one ear when I stamped it and stamp a second time behind it, so it looks like there are two ears in the jar.  

I also used the Friendship Preserves set to make a label for the jar.  I stamped in once in the blue and cut it out.  Then I used the die to cut the shape so I could label it behind the image.  I used the Bitty Banners Framelits die to cut the blue "ribbon" that is behind the "just for you" label.  

Here is a close-up of the corn and the label.  
The paper I used on this one is not from Stampin' Up! but we have some similar.

Thanks for stopping in today!! I've had a bit of a "to-do" with Blogger trying to get into my account (why do they update so often and confuse us???) so it's been a bit since I posted.  I appreciate your faithfulness!!
Smiles, Laura

Sunday, August 12, 2012

Two to show....

Today I have two samples to share.  The first one uses the new Summer Silhouettes stamp set for the flowers.  I love how you can stamp the stems and then add the flower tops in any color you wish.

I am missing Stampin' Up! ovals die this year (it was discontinued) because I had to use a non-SU die for the oval and scalloped oval.  Maybe we will get one later in the year.  The designer paper background is also non-SU - this is a card Judy and I made during a "play day".  But I love how it turned out and had to share it with you. 
Notice the stamp across the bottom of the card.  It is also in the Summer Silhouettes set and I love how it is long enough to go across the card.  Love it!!  This one is quick and easy to make, but good for any occasion.

This next one I saw on Dawn Griffith's blog and just had to make one myself.  He is so cute I want to just sit him on the shelf above my stamping table!! hee, hee.  I used the second to the largest heart die for his head, folding the card and leaving just the slightest flat spot at the top of his head (see it there?) for the fold.  Yes, it is a card.  I used circle and oval punches for the rest of him.  Thanks for the card to copy, Dawn!!

Thanks for stopping by!! See you again soon---leave your comments, OK? 
Smiles, Laura

Friday, August 10, 2012

A new shape....

We made this card in class last month and I love its shape.  I used the new Oval Accent Bigz Clear die to cut the card itself (made from Marina Mist).  I first folded the cardstock, like I would for a regular card I was making, and then ran it throught the Big Shot with the die.  Notice the slight flat place on the top of the card?  That's where it's folded.  Then I ran the front of the card only through the new Fancy Fan embossing folder to give the card texture.  Love it!!

I like how the largest die from Apothecary Accents Framelits group fits inside the Oval Accent shape, so I cut designer paper from the World Spectacular collection to put on the Marina cardstock. 
I used another die from the Apothecary Accents die collection for the light blue sentiment shape.  And I smudged Marina Mist around the edges--you know how I like smudging!  The sentiment on this card is from the Trust God stamp set.  I decided some yellow butterflies cut with the Beautiful Wings embosslit would be a nice touch, so I added those. 

Opening a card envelope to find this unusually-shaped card would be fun!  Make one for folks on your mailing list!!

Thanks for stopping by.  Please leave a comment as I love seeing what you think!! Smiles, Laura

Wednesday, August 8, 2012

Let's do some quilting

Let's do some quilting--on paper of course.  Before I started making cards and being so "in to" paper crafts, I was a die-hard quilter.  I made quilts for the bed, quilted wall hangings, quilted banners for my church, placemats, table runners, you name it.  So it seemed appropriate to try this quilted card.  I used Soft Suede, Primrose Petals and Whisper White for my quilt squares.  I punched them out using a 1" square punch and cut them in half diagonally before "piecing" them together in this pattern.  The center square is Comfort Cafe designer paper. 

Because the background of the Designer Cafe paper is vanilla, I should have used vanilla paper rather than white, so I smudged vanilla ink all around the card to darken the white a bit.  Works for me....

The sentiment is from the Teeny Tiny Wishes stamp set.  

There are TONS of quilting patterns that will make wonderful card fronts.  I will be making more of these!!
Thanks for stopping by today!  Smiles, Laura

Monday, August 6, 2012

Perfectly Preserved....

OK, on August 1 we could start ordering from the Holiday Mini.  I ordered almost everything in the catalog during the preorder period and spent TOO much!! But I loved this canning set--stamps and dies that coordinate.  What a great set this is going to be to use!!

This first card I made for a swap I participated in.  It used Island Indigo cardstock for the card itself and the fold-over is made using Cajun Craze.  I used the new Window Frames Collection Framelits to cut the cajun cardstock.  I also used the new Festive piercing pack to pierce around that shape.  The designer paper on the indigo is from the new Orchard Harvest collection.

The jar is from the Perfectly Preserved stamp set cut with the Cannery Set framelits.
 Since I had used most of my designer paper in that cross-stitch pattern, I created this card (below) for my class to make.  We used the same designer paper, same stamp set and dies, but the card is Lucky Limeade and More Mustard.
To me, it doesn't matter which colors you use.  I love this card!!  Have fun making your own!!
Smiles, Laura

Saturday, August 4, 2012

Zoo Review...

Here is a masculine card I made for a friend's birthday, which is today.  I hope he has a wonderful birthday!

This one uses the Zoo Review animals.  The card is made from Island Indigo cardstock and I used soft suede striped paper from the Neutals Patterns series.  The animals are stamped with suede ink on vanilla cardstock.  They are all mounted on Soft Suede cardstock and backed with the Island Indigo.  Nice there there is no coloring on this one, but I think it makes a greater impact without coloring!
The Thinking of You sentiment is from the Best Dad Ever stamp set.  I stamped it on very vanilla cardstock and backed that with suede and indigo, and of course raised it with dimensionals.


This card is carrying special birthday wishes with it!!  Smiles, Laura

Friday, August 3, 2012

Elegant Butterflies.....

Today I'm showing you one card, with just a slight variation on another.  This card is Gumball Green with Floral District designer paper on it.  I punched 1-1/4" and 1-3/8" circles and the punched out butterflies using   the new Elegant Butterflies punch.
When I got to class, I decided to see how the butterfly looked against the Rich Razzleberry card stock, without the white circle on top.  We all decided we liked it better that way, so hence the two different looks. You can decide which you like better.
The sentiment on this one is from the Itty Bitty Banners set punched out using the Bitty Banner Framelits.  This made a nice birthday card to send to my friend Margaret.

Thanks for stopping by.  Leave your comments; I love reading them!
Smiles, Laura

Wednesday, August 1, 2012

Serene Silhouettes....

This card uses another new stamp set I just love.  It's Serene Silhouettes.  You can stamp it in black and it's quick, but makes a GREAT card.  I was inspired for this card by one my friend Regina made.  She's SO talented!

This card is Bashful Blue and the front is the new Summer Starfruit backed with Basic Black.  Now, lots of you don't like the starfruit color; I'm hearing.  While it's not my FAVORITE, I do like it.

I stamped the flower from the Serene Silhouettes set on the starfruit cardstock using the Summer Starfruit stamp pad.  I wanted it to show up but not dominate.  In the lower right corner, I stamped one of the sentiments from the Trust God stamp set in black.

For the image on the front, I took a white piece of card stock and brayered Bashful Blue on one half and Summer Starfruit on the lower half.  Then I stamps the "weeds" image using black ink.  That is then backed with black cardstock.  

Well, I decided it still needed something else.  I decided to punch two small shapes using one of the punches from the new Little Layers Punch Pack.  I folded it so half was on the front and half on the back.  Still I wanted more!! So I used the Beautiful Wings Embosslit to cut just one small butterfly to put on my card.  I think that was it!

Hope you like this one today.  Come back and visit my blog soon.  And leave a comment if you'd like; I read every one and LOVE hearing your input!
Smiles, Laura