Saturday, April 30, 2011

Happy Greetings Sneak Peek

Here is another card with a sneak peek from the Summer Mini.  This one uses a sentiment from the Happy Greetings stamp set.  I like this one and will use it ALOT, I know.  I also used the Friends Never Fade stamp set from the big Idea Book and Catalog.
Since the flower stamp is one you'd want in multiple colors, I used markers in Real Red, Pear Pizzazz, and Chocolate Chip to color in the flower. These colors go with the Greenhouse Gala designer series paper (dsp) I used for both the background and the opening.  The card itself is Real Red, layered with Pear Pizzazz.  I layers one side of DSP over the Pear.  For the cut-out part, I punched out a half circle on each side with the big 2-1/2" Circle Punch.
I think this one would be suitable for any occasion!

Thanks for stopping by today!!  Smiles, Laura

Friday, April 29, 2011

Beautiful flowers....

No, this isn't a stamping entry today, but I just had to share pictures of the lovely flowers I bought this week.  These were just tightly closed buds when I bought the flowers, but now they are opening and I am enjoying them SO MUCH.  These lilies are Oriental Lilies.  (I have seen them called Asianic Lilies, too.) 
 Now mind you, I'm no gardener and do not claim to "know it all" about flowers.  But I know what's pretty and what I like to plant in the yard.  I have some other colors of lilies and think I shared those with you last year when they bloomed.  These will go in the yard, too.
This one is a Calla Lily in light pink.  I don't any any of these and I hope this one will multiple and spread.
 Here is the white Oriental Lily. 

The neat thing about having these in the house or on the deck before I plant them is that they smell wonderfully sweet!! I just love them. 

Thanks for indulging me today and letting me share some of my photography!  More stamping tomorrow!
Smiles, Laura

Thursday, April 28, 2011

Gold fish....

Recently Brenda Ruse shared a card similar to this one with one of the yahoo groups I'm a member of.  I decided I wanted to make one myself, with a few changes.  Originally this was going to be a birthday card for Dillon, but he's turning 13 so it's a bit young for him.  I'll design him another one.  But he DOES love to fish.

Anyway, this one is fun to make.  Since I didn't have a pattern for the "bowl", I just free-hand cut one to use, The card folds open at the top. 
The fish are made with Pumpkin Pie and Daffodil Delight cardstock.  I stamped the parts first using the Build A Blossom stamp set and punched them out with the Blossom Petals Punch.    Here are close-ups of those two fish.
 This bigger fish was stamped in Real Red using a different stamp from the set.
Brenda didn't have sand in her bowl, but I decided that I needed some "sand" at the bottom of the bowl (or gravel, if you will) so I cut it from Sahara Sand CS (what else for sand??  Ha!)  The bits of grass are cut from Certainly Celery CS. 

Isn't it clever what folks keep finding you can make from our punches!! I think this one is very cheery!
Smiles, Laura

Wednesday, April 27, 2011

Summer Mini Sneak Peek....

Here is a card I made for a Summer Mini swap using a set from the upcoming Summer Mini catalog which begins on May 1.  The card is Pumpkin Pie layers with Baja Breeze which has been embossed with the Finial Press embossing folder.  The designer paper used is from the Greenhouse Gala series.  This flower and sentiment are from a new set called On the Grow which will be available on May 1.  The flowers and jar are so much fun to paint. 
 Here is a closeup of those flowers.  I cut the oval using the Ovals 2 die and the Big Shot.  Because we have no oval to layer behind it, I punched a Scallop Circle and cut it in half and put it behind the top and bottom of the oval.
 Here is the "thinking of you" sentiment.  You can hardly tell it, but the Baja Breeze cardstock is embossed with the Finial Press embossing folder.
 OK, an even closer shot of the flowers.  These can be any color flowers, so they will go so well with all our designer paper!!
Thanks for visiting me today!! Smiles, Laura

Monday, April 25, 2011

Happy Birthday, Becky....

My sister Becky is an avid golfer and her birthday is coming up, so I made her this card for her birthday this year.  The colors are Garden Green and Pumpkin Pie.  The designer paper is from the Brights Pattern Paper stack.  I punched out the F O R E  U using the Naturally Serif die and my Big Shot.  Love how that die cuts letters.  Then I stamped the On the Green stamp on whitecardstock  and layered it on Garden Green cut with the Scallop Squares Duo Die.
For the golf ball, I punched it using a circle punch, then embossed it with the Perfect Polka Dots embossing folder and sponged the edges with Sahara Sand.  I popped it up with dimensionals.  The tee was also freehand cut from Sahara Sand cardstock.
 Here is a close-up of the sentiment. 
Here's the inside---with another golf ball, of course.
Becky has already gotten her birthday card and gift from me.  She liked it and I KNEW she would!!
Thanks for stopping in today!!  Smiles, Laura

Sunday, April 24, 2011

Happy Easter!!

Happy Easter to all of you!! I just have to share with you the cross our church members decorated today in our sanctuary.  The cross itelf is a prior year Christmon tree from the sanctuary and we trimmed the branches to make a cross---a way of linking Christmas and Easter.  It stands in our sanctuary during Lent to remind us of the season, with appropriate colored drapes on it.  For Easter Sunday we wrap yarn around it so that members can bring flowers from their home gardens to tuck into the yarn to make a beautifully decorated cross.  This is a very special part of the Easter service for all of us and we all delight in the finished cross each year.  What a lovely reminder of our Lord's triumph!
We also put a temporary cross outside the church during Lent with purple, black and white drapes on it.  Today many decided to also decorate that cross.  Isn't it lovely!!
I hope you are all enjoying a wonderful Easter with your families!!  A blessed day to you all!!
Smiles, Laura

Saturday, April 23, 2011

Hoping for twins....

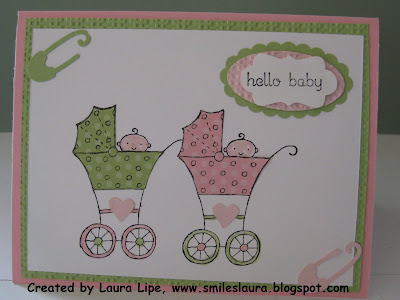
My niece and her husband are hoping to adopt twins from China and are gathering funds needed for their adoption and the trip to China to get them.  I wanted to send them money to help and so I made this card to send it in.
.
Since they will both be girls, I wanted to stick with a pink and green color theme.  I used Pretty in Pink and Certainly Celery for this card.  I stamped two of the baby buggy from the Baby Bundle set and paper pieced the two buggies with the Subtles Patterns DSP Stack.
Inside (which I failed to capture in a picture before mailing it off) is a pocket to hold my check and three more neat little baby "items" from the Baby Bundle stampset.  It was a fun card to make.  I hope they get the girls in July as anticipated!
Smiles, Laura

Thursday, April 21, 2011

One more Easter card....

OK, finally to share a sample with you.  I just had to share this one more Easter card.  I love these soft colors.  For this one, the card itself is Baja Breeze, with the cardfront being Vanilla.  I ran the vanilla through the Framed Tulips Embossing folder.  Then I sponged Baja around the outer edge of it and sponged Pretty in Pink over the tulips inside that.  This looks so soft and pretty for Easter. 
 The large pink flower is made using the Blossom Petals Punch--a larger size in Pretty in Pink and the smaller petals in Pink Pirouette.  The large center is from the BoHo Blossoms punch.  And I put one little Baja Breeze flower center in the middle of that. 
For the smaller flowers I punched them with the BoHo Blossoms punch and sponged the edges with Baja Breeze.  I added the wide Pretty-in-Pine grosgrain ribbon and tied it off with the Victorian Crochet Trim. 

The sentiment--Easter Wishes--is from the Something to Celebrate level 2 hostess set.  I'm going to miss that one when the Occasions Mini retires. 

I hope you like this one!! More later.  Thanks for stopping by!
Smiles, Laura

Wednesday, April 20, 2011

We're home....

Thanks to those of you who missed me while we were at the beach.  We had a wonderful time!! The weather was gorgeous--not too hot, not too cold.  And the pool was heated so I stayed in it all I could.  In addition to the pool fun, the grandchildren loved walking on the beach and looking for shark's teeth--one of my husband's favorite things to do.  Here is a shot of the children with their step-mom Rita.  Myrtle Beach has such long, pretty beaches.  We love going there.
                               
 One afternoon, we were seeing rainbows in the thin layer of clouds --not in the usual rainbow shape, but just all on the bottom layer of thin clouds.  We looked up at the sun and it had a rainbow around it.  I took this shot--no, that's not glare on my camera, but actually how it looked in person.   It was about 4:00 or so in the afternoon when I took this shot.
 The news that night reported there were ice crystals in the thin clouds and it was refracting the sun rays.  They had many pictures of this on the news.  Neat that we got to see it.
 My husband always LOVES to get up and see the sun rise.  He tries to wake me up to "show me" but I resist as much as possible.  Well, this year he didn't go with us, but I saw 3 sunrises!! Isn't that always the way---you wake up even when you can sleep late. So the last morning I took these pictures of the sunrise so I could show him when we got home.  They turned out to be a beautiful shots!  Here it is just as the sun was coming up out of the water.
And here it's fully over the horizon.  Lovely, huh?
OK, I have been stamping since I got home--just a bit--and will share a sample in my next entry.  Thanks for indulging me and enjoying my beach shots!
Smiles, Laura

Thursday, April 14, 2011

Easter is coming....

I always think of butterflies when I think of Easter, because we are reborn then into a new being---like the caterpillar when she becomes a butterfly.  This one is very similar to the butterfly easel card I shared earlier (same colors) but I wanted this one to be an Easter one.  I used the Top Note Die on this one, too, but cut alot of butterflies using the Beautiful Wings Embosslit.  The colors are White and Pink Pirouette.  For this one, I used the word CELEBRATE from the Something to Celebrate hostess set.  (And don't we have something to celebrate at Easter!!).
I did some sponging on this one, too, to highlight the buterflies.  Here is a close-up of them and my sentiment label.
I'll be away at the beach the next few days---taking the grandchildren for their spring break.  I might share some "blast from the past" cards---cards that I made before I had my blog--but if you don't find me here, please come back around April 17 to see more of my work.  I am always so grateful you stopped by to visit with me!!
Smiles, Laura

Tuesday, April 12, 2011

One more Easel Butterfly....

OK, one more butterfly easel today--this one more suitable for a man.  I just love making these and can't seem to stop myself.  I hope you are not bored yet!

This card is Marina Mist with a mat of Pear Pizzazz and a layer of stripe designer paper from the Sale-a-bration Ice Cream Parlor pack.  I just love the stripes on this one.
Not too much to tell you on this one, if you've visited my blog recently.  This butterfly is made just like the last two I shared.    Here is another shot of it opened up ("fluffed out").
As you can see, the layers are Marina Mist, Pear Pizzazz, and Bashful Blue and all are run through a couple of embossing folders to give that butterfly texture.  And of course I sponged color around the edges to add interest.  One more close up of the butterfly, sitting up.  I sent this one to my stamping friend Holly so she could enjoy it sitting on her desk.
I did add some photo corners to two edges of this one, because I was not putting the strip or ribbon across it.  I guess you might say it's a bit drab, but I love the green and blue on this butterfly.

Thanks for stopping in today!! Smiles, Laura

Sunday, April 10, 2011

More Butterflies...

Here is another buterfly card I made recently.  It's so light in the picture because I used Pink Pirquoette and Whisper White for it.  I hope you can see it!
The card and Top Note die cut-out are in the pink and I matted that with white that had been run through the Square Lattice embossing folder. 

Again, I cut out four butterflies with the Beautiful Butterflies die, one of them on the fold.  Two are white and the one on the fold and the center one are pink.  Here is a close-up of the butterflies standing up. If you are familiar with easel cards, this is an easel butterfly on the front of a card--something alittle different.
Here is the butterfly standing up and you'd sit the card when you receive it.
I put some smaller buttterflies on this one, using the Beautiful Wings Embosslit Die.  This one is very feminine and would make a great birthday card for a sweet lady! 

Thanks for stopping in---let me know how you like these modified easel cards!  Smiles, Laura

Friday, April 8, 2011

Triple Butterfly....

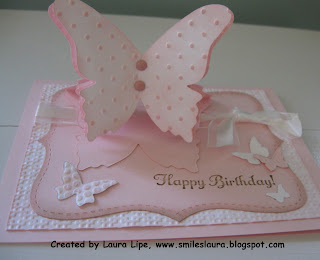
Today I want to share a card I made recently using the Beautiful Butterflies die.  Here is the card laying flat on a table---like you'd mail it.
Here is how it looks when you "fluff" it up.    I love how this butterfly turned out.  The card itself is Tangerine Tango cardstock, with a mat of Pumpkin Pie and striped Daffodil Delight from the Patterns Paper Stack on top of that. 
From the side, you can see the butterfly layers.  It, too, is Tangerine Tango, Pumpkin Pie and Daffodil Delight.  I ran all three through Vintage Wallpaper embossing folder.  I added dimensionals in between each of the layers, and then added 3 brads to the center.  You can see the brads in the first picture.  I smudged Tangerine onto each layer to add some color.
Here is a shot of  how the butterfly stands.  I folded some Tangerine cardstock  in half and ran it through the same butterfly die, to give me one on the fold.  Then I folded the front in half and glued my butterfly to the bottom half of that one.  The bottom part of the butterfly I put behind the long piece that goes across my card.  (Is that clear as mud?  It's hard to explain, but I hope the pictures explain it better than I am.)  If you are familiar witih an easel card, this is an easel butterfly on the front of a card.
I love how this card can lay flat for mailing, but when you lay it on the table, you can stand up the butterfly and fluff it and have a great butterfly to view.  My dad got out of the hospital recently---I'm going to make one to send to him!!  He'll like it.

Here is the Hello sentiment on the card.
Again, I sponged around the scalloped oval and run the Pumpkin oval through the embossing folder to give it some texture.  "Hello" is from the Tiny Teacup stampset.

I hope you like this one!!  Go try one yourself!! Thanks so much for visiting my blog.  Leave me comments as I love seeing what you think about my work---be kind and gentle.  ha!  You guys always are!!

Editorial note:  I first saw an easel butterfly card on Bronwyn Eastley's blog (here).  Hers was a small sized card, like a gift enclosure, just the size of the butterfly.  I added mine to a regular sized card and also made all three layers of the butterfly the same size.  So while mine is not identical to Bronwyn's design, I do want to credit her with the idea.  Thanks Bronwyn , for inspiring me.  Check out her blog for her other great work!

 
Smiles, Laura

Wednesday, April 6, 2011

A Woven Hello.....

I am participating in a challenge swap this week and the sideboard were that the card MUST be 4-1/4" x 4-1/4".  Here is the card I came up with.  I saw a card by Carrie Gaskin (the Artictic Avenger--12/9/10 entry) with a woven rectangle on the front and knew I had to try one.   (Here)
Mine, of course had to be square, so it's very different.  I chose So Saffron, Pear Pizzazz, Poppy Parade and Peach Parfait for the colors of my woven area.  That woven area is mounted on Poppy Parade and backed with Pear Pizzazz.

The butterfies are from the Flight of the Butterfly set.  The sentiment "Hello" is from the Tiny Teacup set. 
I punched the pear with the scallop oval punch, and layered that with the Large Oval punch from Poppy.   I ran that through the Square Lattice embossing folder to give it texture.  I punch out a Decorative Label from Saffron, turned it 90 degrees and punched one end again for the "Hello".  I love this small label it makes!!

I hope my partner getting this swaps likes it!!  Smiles, Laura

Monday, April 4, 2011

Birthday Birds....

Granddaughter Jessica wanted to make her daddy a birthday card the other day and this is the card we made. (She made one to mail and I made one for fun.)   I've made birdies using the Ornament punch before but didn't bother to hunt it up.  We just made this one from scratch.   Aren't these two cute!!
                            
The body is the Ornament Punch.  The wings are made using the wings from the Two-Step Bird Punch.  The beak is the heart in the Two-Step Owl punch.  We used the butterfly punch for the lighter parts of the body.  And the feet are a circle cut in half.  I MEANT to trim that to toes, but forgot to before mounting it.  Oh, well...

This birdie is made with Not Quite Navy and Marina Mist cardstock.
Here is the red/pink one.  She is made using the Cherry Cobbler and Pretty in Pink cardstock.
The card itself is Marina Mist and the white cut from the Top Note die is layers onto Not Quite Navy.  Jessica was very pleased with how this card turned out.  I know her dad loved it!!

The sentiment "Celebrate!" is from the Something to Celebreat Level 2 hostess set. 

Hope you like this one!! Smiles, Laura

Saturday, April 2, 2011

Easter chicks....

I decided to make some of these cards to mail to family for my Easter card this year.  Aren't these little chicks the cutest!!
I made them using the Two-Step Bird Punch.  There were two of them on my collages I shared in an earlier entry.  The card itself is Wild Wasabi, matted with So Saffron and then topped with the "picture" of the grass/yard.  I used the grass stamp in the Inspired by Nature set to stamp the grass.  Then I sponged a little Wasabi ink across it to look like the ground.  I also sponged some Bashful Blue for the sky.
To make the little chicks themselves, I punched the bird using the Two-Step Bird punch and cut up from the body to take off both tails.  I sponged the edges with some Saffron ink.  The wing is punched from So Saffron, using the end of the Scallop Oval.  I trimmed it a bit to get it the correct shape.
  
For the sentiment, I punched cardstock with the Decoration Label, the 1-3/8" Circle and the Large Oval punches.  The "Easter Wishes" comes from the Something to Celeberate level 3 Hostess set.

I hope my family likes this little card! Thanks for stopping by today!! Smiles, Laura

Ed. note:  When I posted this sample, I knew I had seen these chicks somewhere but could not remember and did not have her name.  I finally found them again this week.  They were shared by Ann Fitzgerald.  See them on her blog:  http://www.annscreativemoments.com/ .  Thanks, Ann, for the idea!