Tuesday, October 30, 2012

Well, how nice is that!!

How nice that my card posted on 10/21--the one with the gingerbread men--was featured on Tiffany Bauer's Mycrafteyworld blog yesterday. I am so excited because it is my first time on it!! Here is the badge Tiffany awards.
                                                             And here is the card she featured:
You can check it out at www.mycraftyworld.blogspot.com.  Wahoo!!
Thanks so much, Tiffany!!
Smiles, Laura

Sunday, October 28, 2012

Another Center Easel--Connie's birthday....

I thought I had shared this card with you earlier, but can't find it on my blog so I guess not.  I did share the center easel layout and instructions with you in the last week or so, so I won't give those again.  You can backtrack on my blog and find them.  But I did want to share this card because I made it for my sister Connie's birthday.  I went to my hometown for a birthday supper with her and my family and yes, had her birthday gift with me, but had left the card laying on my stamp room table! So bad!  I had it made for her for over a month before her birthday and then to forget the card!! Ugh!  Anyway, I mailed it to her later and she got it AFTER her birthday.  But it was the first time she had seen the center easel fold and I think she liked it!

This card is made using Island Indigo cardstock, and Chocolate Chip and the International Bazaar designer series paper.  I love that paper! The flower is stamped using the Mixed Bunch set and punched using the Blossom punch.  There are two flowers layered on top of each other.  I used the Window Frame Collectiono die to cut out the chocolate.  If you want a slightly larger layer, as I did, you just flip the die over and trace around the larger outside and cut it by hand.  That gives you a shape just about 1/8" larger that the image the die cuts.
 Here is how it looks open and standing up on a table.  I love that these card can be left standing open to display your message.  That's the beauty of an easel card!!
Here is a side view.  If you are unfamiliar with an easel card, this will help you visualize it.  There's room for more "message" behind the easel (you can see the stamped words on mine here) and you can fold the easel up (like you would normally open a card) to sign the card.
I hope you like this one and it inspires you to go try your own center easel card!
Smiles, Laura

Saturday, October 27, 2012

Squash Fold Card...

I posted this card some time ago (September 3 and again with other colors on September 5) and attempted at the time to tell you how to make it.  I got some emails asking for a picture tutorial.  So I FINALLY found time to take those pictures and in the process found a simpler way to show you how to make the card.  Here is the front:
 And here is how it looks opened up:
1.     Start with 4” x 8” pc. of designer paper (DSP).  Score the long side at 2” and 6”. 
2.    Mark the center of the paper with a pencil at 4” on the top and bottom (long side) of this paper.
3.    Fold the bottom right corner in to the top center mark, which is at 4”.  Fold the bottom left corner in to the top center mark also.  Unfold the paper so it’s flat again.

4.    Now fold the top right corner in to the bottom center mark (at 4”).  Fold the top left corner in to the bottom center mark also.  When folded out flat, the sheet will appear to have two “X” folds in it. 


 For the card:  4-1/4” x 11” pc. of cardstock at 4”, 8”, and 10”.  Make a “valley” fold on the 4” and 8” scores and a “mountain” fold on the 10” fold.

Starting on the right side, adhere the paper to the cardstock starting at the 10” mountain fold and continuing to press down until it is fully in place.
That's it.  Fold up the card and decorate as desired.  Here's the inside of mine again--different designer paper, of course.
I also shared a Christmas card made like this earlier.  I hope these instructions have made it easier to figure it out and to make your own.

Let me hear from you, if these instructions helped!  Smiles, Laura

Wednesday, October 24, 2012

Surprise Box....

Today I want to share with you a little box I made that is entirely from a 7.5" x 10" piece of card stock.  The sides of it fold up to close it, as the top.   I saw this on Dawn Griffin's blog. I have tried to put the directions on the pictures.  


 At this point, it would look like this.
 Here is where you add adhesive.

 To make it into a box, follow directions on this picture:
It should look like this:
To decorate the box, cut 4 pieces 2-3/8” square of designer papers to apply on the two inside sides of the box and 2 outside sides.  Cut 6 pieces of 2-3/8” x 1-1/8” designer paper to apply on the two pieces of the box top and along the two pieces on each side of the box.

 The two sides will fold up to meet at the top.  Cut a 1" x 12" piece of designer paper or cardstock to go loosely around the box as it's band.  You want it loose enough to slide off in order to open the box.   I hope you can figure it out from my instructions.

Here is another box I made.  I love how this top matches the design in the paper.
 There is another box in the foreground in this shot that uses other colors.
 Oh, and to make the top of the original box I showed, I punch out about 15 circles using a 1" circle punch and glued them together to make this design, which also matches the designer paper, I think.
 I hope you like this one!!  Smiles, Laura


Tuesday, October 23, 2012

Another Gingerbread man....

I am having so much fun with the gingerbread man from the Scentsational Season stamp set!!  For this card, I also stamped two of the mugs and one candy cane and cut them using the Holiday Collection dies.  I think this is such a fun card.  

I cut off  1-1/2" from the front, so that the inside would show.  For it, I cut a strip of Cherry Cobbler cardstock and punched each long edge using the Scallop Trim Border punch.  Then I layered designer paper from the Festival of Prints designer series stack.  I love that those papers are double sided; so versatile!!

I covered the shortened front with Cherry cardstock and layered that with designer paper from the In Colors Patterns stack--in Lucky Limeade.  (The card itself is also Lucky Limeade.)
For the sentiment, I stamped it on vanilla and cut it using the Apothecary Accents Framelit.  I then cut two more in Cherry and trimmed them to put behind the vanilla one, to frame it.  Love that look!

Hope you like this card!  Smiles, Laura


Sunday, October 21, 2012

Cut-away Top card....

OK, I'm at a loss and do not know what to call the cut on today's card, so I am calling it the "cut-away top" card.  

 I made this card for my friends Joan and Will when his mother died.  I knew Joan has seen all my cards so I needed to come up with something different for her.

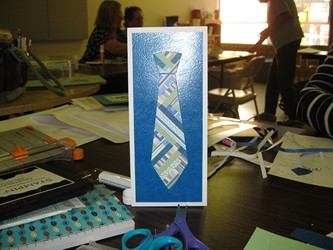
This card is made using Baja Breeze cardstock with Soft Suede and Whisper white.  I folded the cardstock in half (4.25" x 11" to make it 4.25" x 5.5" ).  Then I cut 1-1/2" off the top of it.  I used the 1-3/4" circle punch to snip out a half-circle.  The stamp set for the sentiment is the So Sorry set.

I used the Large Scallop die and the Delicate Designs embossing folder to cut the white which I attached to Suede, and then put a Baja Breeze ribbon around it.
 Inside I stamped the flower from Serene Silhouettes, colored with my Suede and Baja markers.  I stamped more sentiment from the Love and Sympathy set.
This card is so soft and lovely--very appropriate for a sympathy card.

I liked the layout so much, I decided to make a Christmas card using it.  Here is the card I made:
 For this card, I only cut 1-1/4" off the top of the front.  I used two different circle punches to cut both the Baja Breeze card and the larger to cut the designer paper.  The sentiment is from the Greetings of the Season set in the Holiday Mini.

Of course I had to add gingerbread men!  I used the Scentsational Season set to stamp them in suede, and the die from the Holiday Collection to cut them both out.

Here is the inside--still room to add another sentiment, if desired.
I can think of many other themes for this layout!  I hope it has inspired you, too!!
Come visit again soon.  Smiles, Laura


Friday, October 19, 2012

Center Easel Card....

Today I'm showing you the second Halloween card I am sending to my sisters this month.  It is a center easel card and I think they will like it.  I did a center easel for sister Connie for her birthday, but the others did not see it.  I saw the center easel on Bronwyn Eastley's blog, addinktivedesigns.blogspot.com  as her May 19, 2012 post (don't remember what she called it so I am calling it a center easel) and she says she saw it in Creative Stamping Magazine, Issue 3.  You can tell we stampers all share and use what we make and find elsewhere.  But Bronwyn is definitely the "easel queen" so I appreciate her inspiration.

For this one, I used Tangerine Tango, Basic Grey, Basic Black, and Very Vanilla cardstock. The designer paper is from the Howlstooth & Scaringbone series.  Love that paper!!  The little cat on the front is the Frightening Feline stamp.  I stamped it in Tangerine and then stamped the SCREAM again in black, cut it out and layered it over the tangerine "scream."  I added a bow for the cat's neck and Rhinestone jewels for his eyes.  I layered him on black and grey that I cut using the Window Frames Collection dies.

OK, for the "hows."   I folded the standard card in half (5-1/2" x 11").  Cut at 1-1/2" and at 4" from one side all the way in to the fold.  This gives you two sides that are 1-1/2" wide and a center section that is 2-1/2" wide.  Score the center section across its middle (at 2-1/8".)  Glue down the two side "flaps" and fold the center to make an "easel fold."  
 Decorate the front with designer paper.  The grey dotted here is 2-1/4" wide x 1-7/8" high--you need two of these.  The side pieces are 1-1/4" wide by 4" high.  After you get the designer paper added, the add the cat.  For the inside "boo," punch out a black circle and cut the smallest Window Frames Collection die.  "Boo" is from the Spooky Bingo Bits stamp set.
I hope this card is a hit when my sisters get it.  I like it!!

Thanks for visiting my blog today.  Please leave comments, so I'll know you were here!
Smiles, Laura

Thursday, October 18, 2012

More cards made in class....

I thought I'd share more cards we made Saturday in class.  A couple of these are my FAVORITES and I know I'll be making more of them.  In fact, I've been down making more quilted cards in other layouts today.  I think Holly get me started and I'm pulling out some of the quilt magazines that haven't found a home yet.  Did I toss too soon???  We always wonder after disposing of something if we'll need it again???  I usually do! Ha!  That's why I'm such a pack-rat.  So, here are several cards....

Love this one!! I need more mountains in the picture, but still I like it!
 This one uses sticky paper with a metal die matting it while you sprinkle blue glitter on it.  Then you remove the die and sprinkle white glitter on it.  Love it!!
 This one was chalked and I love the stamp!! In fact, the local scrapbook store is ordering me a set in the smaller size (it is offered in large and small---sorry I don't know the company who makes it.)
 For this one, we selected little 1" squares of designer paper, made our quilt pattern (I think I was the only one on our table who did it on the diagonal!), and then embossed it all.  Then we sanded it all to take off some of the color and to make it look worn.  Finally we added thread to the center in four places.  Oh, and it's an easel card held up by two little buttons.  CUTE!!
 For this one, we folded the designer paper and then glued it on from the back.  I wish I had the paperwork Holly gave me to tell you what this is called. (It's downstairs and I'm not into a trip down right now.)  Some of you know what this is called and have done it.
OK, aren't those cards neat!  I'm telling you, Holly Craft is GOOOOOD!!!

Come visit again soon!  Smiles, Laura

Wednesday, October 17, 2012

Playing with Holly and Judy....

Saturday Holly Craft (yes, you all know her, she has worked for Spellbinders, EK Success and other nationally-known companies) came to teach a class for our local stamp club, Smudge Bunch.  Holly came on Friday (she lives in GA) and made time to play with me and my friend Judy in my stamp room.    We had a great time playing and laughing (my husband upstairs wondered what was going on, we laughed so much!!).  We got some neat projects made.  Here is a shot of Holly.
And here is Judy
We made a twisted quad card that I'll show to you another day, with instructions.

Here are Holly and Judy working on another card.  I had seen the triple heart easel card on Pinterest but had no instructions.  

We laughed so hard trying to figure out and get even this triple heart easel. We finally got it, but ran out of time for decorating it.  That will have to be another day!  

The next morning, Holly taught 16 of us in a class she designed on stenciling.  That took us all morning. Holly comes so prepared and brings so many wonderful samples to show and inspire us!!  We made 5 samples.  And in the afternoon, we did 5 samples using quilting techniques.


Here are two of the quilting cards we made.   This one is the Twisted Triore Easel Card.  I really enjoyed making this one!
 This one is the Herringbone quilting technique on a tie cut-out card.  Again, a fun one to play with!  And I've shown you the herringbone technique on cards I've made in the past.  Search my blog for them.
I'll share more of our cards another day.  I only photographed these two in class. 

Well, just wanted to share with you the fun day we had on Saturday.  Come back soon!
Smiles, Laura