
You've all seen my polar bears I designed and shared--apparently they have become all the rage on lots of blogs.  Funny, we have all thought of lots of other "critters" but not polar bears. I made some last year but didn't think to share them. Well, now my customers want to make them, but I didn't want to make a Christmas card in January--so I decided to make a winter card for Valentines.
  My previous bears showed a mommy and a baby bear. I decided for Valentines, I wanted a male and a female, so this time the one on the right is made larger--using the 1-3/8" circle punch, rather than the 1" circle punch. And I added hearts over their heads to show they are in LOVE. Ha! The heart is punched with the Heart to Heart punch. I stamped the I {heart} U from the A Happy Heart set. That one is my all time favorite Valentines set!!
You've seen the mouse I made earlier, too. Here he is again . Well, again my customers wanted to learn to make him but I wanted a Valentines mouse. So I designed this card (below). This little fellow is holding a heart punched with the Full Heart punch. I stamped the message "always on my mind, forever in my heart" from the Always stamp set inside a circle from the new I {Heart} Hearts set which will be available in the Occasions Mini. (You are going to LOVE the Occasions Mini!!) I just love this little mouse that Ellen Kemper and Lynn Pratt came up with!! Check out their blogs to see how to make him. (I'm sorry that I do not know how to connect a link to their blogs!! I MUST learn how to do that!)
 Funny, we have all thought of lots of other "critters" but not polar bears. I made some last year but didn't think to share them. Well, now my customers want to make them, but I didn't want to make a Christmas card in January--so I decided to make a winter card for Valentines.
  My previous bears showed a mommy and a baby bear. I decided for Valentines, I wanted a male and a female, so this time the one on the right is made larger--using the 1-3/8" circle punch, rather than the 1" circle punch. And I added hearts over their heads to show they are in LOVE. Ha! The heart is punched with the Heart to Heart punch. I stamped the I {heart} U from the A Happy Heart set. That one is my all time favorite Valentines set!!
You've seen the mouse I made earlier, too. Here he is again
 . Well, again my customers wanted to learn to make him but I wanted a Valentines mouse. So I designed this card (below). This little fellow is holding a heart punched with the Full Heart punch. I stamped the message "always on my mind, forever in my heart" from the Always stamp set inside a circle from the new I {Heart} Hearts set which will be available in the Occasions Mini. (You are going to LOVE the Occasions Mini!!) I just love this little mouse that Ellen Kemper and Lynn Pratt came up with!! Check out their blogs to see how to make him. (I'm sorry that I do not know how to connect a link to their blogs!! I MUST learn how to do that!)
 Here's another card I made this week. This one also uses the A Happy Heart and the I {Heart} Hearts sets.
For this one I stamped the dotted heart and cut it out and mounted it on a black heart punched with the new Scalloped Heart of Hearts Embosslit die that will be available in January from the Occasions Mini. (Did I say you are going to LOVE this mini!!) OK, the right edge on this card is alittle different--something new I learned from Debbie Henderson (debbiesdesignsblog.blogspot.com) via Lynn Pratt's blog. (Thanks, girls!!) It's a neat trick using the slit punch. Check out Debbie's blog for step by step instructions.
Well, that's it for today! Check back later for more samples! Have a wonderful wintery day!! Smiles, Laura

 Ellen has the punches used on this little fellow listed on her blog so I won't repeat them: Blinkthinkink.blogspot.com. I think I used a few different ones. My fellow's shorts are made using the small tab punch, with the "v" cut with the star punch. And my eyes are alittle different from hers. I did the wording on my computer and punched those ovals with non-SU punches. All the rest of him is made using SU punches. The Stampin' Up! logo on the box was cut from an instruction sheet that came witih my new punches I received yesterday.
 I decided to make a momma using the ornament punch for her head. I guess I like it, too, but the circle is my favorite—probably because it was my first design. And I'm not sure the ornament punch makes a large enough head.
 This little mouse was originally designed by either Lynn Pratt or Ellen Kemper—I’m not sure which, because they both have made him, but I think Ellen. I have made some changes to mine, but basically he is their design. I used the SU Ornament punch for the head and the Snowflake punch for the tree.
 Aren’t they cute? The left mouse has ears made using the Butterfly punch and the right mouse used the wide oval for his head. I love these little fellows.

 Inside:


 For this next card, I sponged on the color first (just like in the card above) but this time I embossed the leaves with clear embossing powder. Then I brayered Soft Suede ink over the card to cover all the colors except what was under the embossed leaves. I love this effect!!
  You might notice in this card (above) that I also punched out ever larger semi-circles in the layers before tying on the ribbon. That is another way to highlight the layer colors.
 I wondered how the card would look if I did not completely cover the background colors, so for this card, I sponged the Soft Suede color, rather than brayering it on. This lets the colors show through a bit and again, I love this effect! I tied the two colors of ribbons to each other, which give it alittle different look.
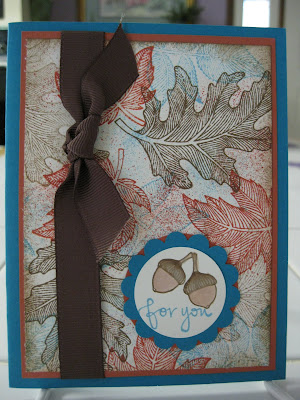 Then I decided to try something different. This one is OK, but I didn't really like this one the best--it needed more layers behind some of the images. So I tried again.
 This sample was getting there, but still that oval needed a layer behind it. So, back to the drawing board....
 I finally came up with this card for my class to make this month! I am pleased with it and think my ladies will like it. I uses the new Aumumn Meadows DSP from the Holiday Mini (love that stripe pattern!!) and Taken with Teal, Really Rust and Whisper White CS and Chocolate Chip 3/4" grosgrain ribbon. I love the backing for the acorns. That's two Round Tab punches layered to make a circle. Neat, huh? And I wanted to add that the Thankful Thoughts of You wording is from the new Grateful Greetings set, also in the new Holiday Mini.
 This card (below) is one I made for a Holiday Mini Swap I participated in. I hope the others in the swap liked my card.
 Here is one more card to show you. This one uses More Mustard and Very Vanilla CS. I embossed the leaves on it using the retired Very Vanilla embossing powder. Look closely at the ribbon. That's the satin organza ribbon which comes in all white. I colored the center strip with my More Mustard marker and let it dry before adding it. Isn't that a neat way to color the ribbon!!