Tuesday, January 15, 2013

God is Love Valentine....

I'm starting to make Valentines because it will be Valentines before you know it.  Here is a card I made recently.  I used Mambo Melon for the card.

For this one, you cut 4  ea.  1-3/4” squares, one in each of 4 coordinating colors of cardstock.  Round two opposite corners on each square.  Put the UN-ROUNDED corners of all 4 together in the center.  Then cut 4 ea.  1-1/2” squares of white.  Round two opposite corners of each of them.  Put the UN-ROUNDED corners of all 4 together in the center, on top of the colored hearts.   Cut 4 more 1-3/4" squares from the same 4 coordinating colors of cardstock.  DO not round any corners, but glue them all together with the points meeting in the center.  Run this through the Big Shot and cut the heart using the 3rd from the smallest heart die from the SU Hearts Collection Framelits.  Before cutting, make sure you have the colors in the correct arrangement if you want each color on top of the same color on the other squares.  You can alternate them or positions the same colors on top of themselves.  It’s your call.  Adhere this to white squares, making sure all the lines "line up".  Cut the white heart using the smallest heart in the SU heart die set.  Raise it with dimensionals.   

I embossed the back white layer using the Fancy Fan folder.  I only did it part of the way down, so I could stamp the sentiment on un-embossed card stock.
The sentiment on this one from the Trust God stamp set.

This is a fun way to start on Valentines!
Smiles, Laura

Wednesday, December 26, 2012

Bold Snowflake...

Stampin' Up! recently offered the opportunity to purchase single stamps.  This Bold Snowflake was one of the stamps offered and that I bought.  I have had fun playing with it.  I made this card for a challenge.  I stamped the image using Versamark ink on Baja Breeze cardstock, embossed it using white embossing powder and punched it out using the Blossom punch.  

For the background, I stamped the snowflakes from Snow Swirled in white onto Baja Breeze cardstock.  After I added the punched snowflakes using dimensionals, I used Dazzling Details to dot the center of the snowflakes on the background,  and to add some random dots of the Detail.  I also  used the Detail on the center of the popped-up flakes and spread some on the tips of each flake.  The pictures doesn't do it justice, as they say.
Here is a close-up of the card.

 I made the same card, but without punching out the snowflakes.  I just embossed them directly onto the Baja Breeze cardstock.  I think I like this one equally well.  What do you think?  Either one is a nice winter card!


Thanks for visiting my blog today.  Smiles, Laura

Monday, December 24, 2012

Miscellaneous Christmas cards....

Today I am sharing 3 Christmas cards with you.  Two are CASE'd from other demonstrators and one I designed.

This first one is my design.  I  used the Greetings of the Season for the sentiment, punched it out using the Windows Collection die.  I also punched out the printed background using a larger Windows die.  The tree is stamped from the Scentsational Season stamp set and punched using the Holiday Collection die.
  I like how this one turned out.
 

This next one is the same layout, you'll notice but the colors are different and it gives it a different look.  Again, I used the Windows die collection to punch out the image for Noel and its background.  This one gets a cup of chocolate, rather than a tree, but I used the same stamp sets and die sets on both these cards.  (I wish I had stamped the "NOEL" lower, but oh, well....)

 This card I saw on Pinterest (without the sentiment) and decided to make one.  I know some of you may have seen it, too, but many of my customers who frequent my blog may not have seen it, so it is for them I post it.  I used the sentiment from the Joyous Celebrations set on the front.  I think I changed the background embossing folder, too.  But I loved the wreath made from stars and wanted to make one myself.
Have a great day today!!  Merry Christmas!  Smiles, Laura

Sunday, December 23, 2012

Santa's Cap...

Here is a delightful card.  The card is Soft Suede, with a layer of Cherry Cobbler, and topped with Crumb Cake.  I embossed a line through the Crumb Cake piece using the Delicate Designs folder.  I used the 1-1/4" circle punch for the red in Santa's cap.  I embossed it with the Argyle folder.  The white  pom-pom is cut using the 1/2" circle punch and I used the ovals punch for the white trim.  The sentiment is from a retired set from last year.
 Here is the same card using different designer paper for the bow.  The bow is a trip!  My friend Carol Morton sent me a card with this "bow" on it and that prompted me to make this card.  I used the Large Oval punch to cut two shapes.  I folded them in half and put a dimensional to hold them up a bit.  I topped that with a 1/2" circle of the same paper.  And I free-hand cut the "ribbon" part behind the bow. So it's all paper!
 Here is the inside.  I used stripes of the same designer paper to decorate the inside.
Come back soon!!  Smiles, Laura

Saturday, December 22, 2012

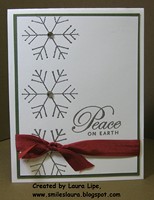
Snowflake Card....

I designed this card last year and loved it so I thought I'd make more of them to send this year.  It's simple, but elegant.
 I'm not sure you can tell in the pictures but I embossed the snowflake in silver and the sentiment.  Well, imagine my disappointment when Stampin' Up! retired this stamp!!  I was dismayed.
 This year I realized I could use the snowflake from the Snow Swirled stamp set to make the same card.  Again, I embossed the snowflake with silver embossing powder.  I stamped the Peace on Earth in Cherry Cobbler.  It is from the Greetings of the Season set.
 I put a rhinestone "jewel" in the middle of each snowflake.
This one is quick, but I think makes a nice card to send.

Thanks for stopping by today!  Smiles, Laura

Friday, December 21, 2012

Santa card....

I saw this card and this Santa on Pinterest and just loved him.  (I've had him made for weeks, waiting to send  to my sisters and then post him here.  Since I made him, I have seen him all over the place on blogs, Pinterest, everywhere.  Sorry I don't know who to credit with the original creation.  The copy I saved did not have a watermark, nor name.) The original one I saw was made on a red card/background and I think the creator used a little different punches for the mustache, but basically I copied this idea.  But he was SO CUTE that I had to make one each for my 3 sisters!  I know they will love him, too!

Here is the card closed--the front.
 Here is the card opened up:
I have given instructions before for making this card layout, just with different images on front.  But here they are again.  You start with a 5-1/2" x 12" piece of designer paper.  Score it at 2", 4", 8" and 10" on the long edge.  Mark the right and left sides at 2-3/4" from the bottom.  Cut from the 4" score line to that mark on the left and from the 8" score line to that mark on the right.  Glue the two pieces cut of to the bottoms of the opposite sides.  Fold.

Here is a close-up of Santa's face.  I cut the pink face using the Labels Collection Die.  I also cut a red and a white piece using the same die.  I cut off part of the red one for the hat and part of the white one for the beard.  I used one of the petals from the Blossom Petal Builder punch for the mustache.  I ran those pieces and the white part of the beard through the Big Shot using the Manhattan Flower embossing folder first, THEN glued them on.
I hope my sisters like this one!! I just love the card and face.  Hope you like him, too.
Smiles, Laura

Wednesday, December 19, 2012

Still more quilting designs....

Yes, I guess you'd say I'm on a roll with quilting patterns.  I recently donated a ton of my quilting magazines and I guess they gave me the idea of combining my former hobby of quilting with my present one of paper crafting.

For this card, I punched circles using the 1-3/8" circle punch.  I also punched squares in different colors of card stock using the 1" square punch.  I put the square in the middle of the circle and folded the edges around it.  
Here is a close-up of the circles folded into squares.
I love the colors in this one.  Like other quilting patterns, you could use any color for the circles and squares, and could use the card for any occasion. 

Thanks for stopping in!
Smiles, Laura