Friday, October 19, 2012

Center Easel Card....

Today I'm showing you the second Halloween card I am sending to my sisters this month.  It is a center easel card and I think they will like it.  I did a center easel for sister Connie for her birthday, but the others did not see it.  I saw the center easel on Bronwyn Eastley's blog, addinktivedesigns.blogspot.com  as her May 19, 2012 post (don't remember what she called it so I am calling it a center easel) and she says she saw it in Creative Stamping Magazine, Issue 3.  You can tell we stampers all share and use what we make and find elsewhere.  But Bronwyn is definitely the "easel queen" so I appreciate her inspiration.

For this one, I used Tangerine Tango, Basic Grey, Basic Black, and Very Vanilla cardstock. The designer paper is from the Howlstooth & Scaringbone series.  Love that paper!!  The little cat on the front is the Frightening Feline stamp.  I stamped it in Tangerine and then stamped the SCREAM again in black, cut it out and layered it over the tangerine "scream."  I added a bow for the cat's neck and Rhinestone jewels for his eyes.  I layered him on black and grey that I cut using the Window Frames Collection dies.

OK, for the "hows."   I folded the standard card in half (5-1/2" x 11").  Cut at 1-1/2" and at 4" from one side all the way in to the fold.  This gives you two sides that are 1-1/2" wide and a center section that is 2-1/2" wide.  Score the center section across its middle (at 2-1/8".)  Glue down the two side "flaps" and fold the center to make an "easel fold."  
 Decorate the front with designer paper.  The grey dotted here is 2-1/4" wide x 1-7/8" high--you need two of these.  The side pieces are 1-1/4" wide by 4" high.  After you get the designer paper added, the add the cat.  For the inside "boo," punch out a black circle and cut the smallest Window Frames Collection die.  "Boo" is from the Spooky Bingo Bits stamp set.
I hope this card is a hit when my sisters get it.  I like it!!

Thanks for visiting my blog today.  Please leave comments, so I'll know you were here!
Smiles, Laura

Thursday, October 18, 2012

More cards made in class....

I thought I'd share more cards we made Saturday in class.  A couple of these are my FAVORITES and I know I'll be making more of them.  In fact, I've been down making more quilted cards in other layouts today.  I think Holly get me started and I'm pulling out some of the quilt magazines that haven't found a home yet.  Did I toss too soon???  We always wonder after disposing of something if we'll need it again???  I usually do! Ha!  That's why I'm such a pack-rat.  So, here are several cards....

Love this one!! I need more mountains in the picture, but still I like it!
 This one uses sticky paper with a metal die matting it while you sprinkle blue glitter on it.  Then you remove the die and sprinkle white glitter on it.  Love it!!
 This one was chalked and I love the stamp!! In fact, the local scrapbook store is ordering me a set in the smaller size (it is offered in large and small---sorry I don't know the company who makes it.)
 For this one, we selected little 1" squares of designer paper, made our quilt pattern (I think I was the only one on our table who did it on the diagonal!), and then embossed it all.  Then we sanded it all to take off some of the color and to make it look worn.  Finally we added thread to the center in four places.  Oh, and it's an easel card held up by two little buttons.  CUTE!!
 For this one, we folded the designer paper and then glued it on from the back.  I wish I had the paperwork Holly gave me to tell you what this is called. (It's downstairs and I'm not into a trip down right now.)  Some of you know what this is called and have done it.
OK, aren't those cards neat!  I'm telling you, Holly Craft is GOOOOOD!!!

Come visit again soon!  Smiles, Laura

Wednesday, October 17, 2012

Playing with Holly and Judy....

Saturday Holly Craft (yes, you all know her, she has worked for Spellbinders, EK Success and other nationally-known companies) came to teach a class for our local stamp club, Smudge Bunch.  Holly came on Friday (she lives in GA) and made time to play with me and my friend Judy in my stamp room.    We had a great time playing and laughing (my husband upstairs wondered what was going on, we laughed so much!!).  We got some neat projects made.  Here is a shot of Holly.
And here is Judy
We made a twisted quad card that I'll show to you another day, with instructions.

Here are Holly and Judy working on another card.  I had seen the triple heart easel card on Pinterest but had no instructions.  

We laughed so hard trying to figure out and get even this triple heart easel. We finally got it, but ran out of time for decorating it.  That will have to be another day!  

The next morning, Holly taught 16 of us in a class she designed on stenciling.  That took us all morning. Holly comes so prepared and brings so many wonderful samples to show and inspire us!!  We made 5 samples.  And in the afternoon, we did 5 samples using quilting techniques.


Here are two of the quilting cards we made.   This one is the Twisted Triore Easel Card.  I really enjoyed making this one!
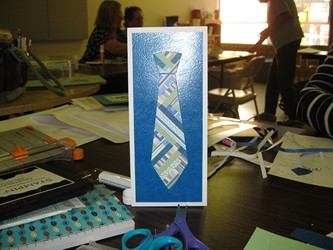
 This one is the Herringbone quilting technique on a tie cut-out card.  Again, a fun one to play with!  And I've shown you the herringbone technique on cards I've made in the past.  Search my blog for them.
I'll share more of our cards another day.  I only photographed these two in class. 

Well, just wanted to share with you the fun day we had on Saturday.  Come back soon!
Smiles, Laura


Monday, October 15, 2012

Shiny web....

Here is a card I made for my three sisters.  In fact, I've made them several Halloween cards this year, so I'll start sending them one a week during October.  I am scheduling these entries to post AFTER my sisters get their cards.  

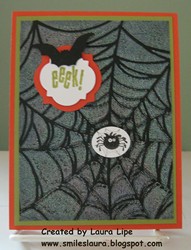
This card is made using Tangerine Tango cardstock, layered with Lucky Limeade.  For the front, I rolled white ink onto my Spider Web embossing folder using the brayer, and then embossed my black cardstock in it.  Then I sprinkled  Iridescent Ice embossing powder over the white ink, which was still wet and heated it to emboss.  I wish you can see this card in person, it is so neat!
The spider and "eek!" are from the Spooky Bingo Bits stamp set. There are so many neat little stamps in that set to use!  

I hope my sisters like this one!!
Smiles, Laura

My Stamping Space.....

I know I've been gone awhile again.  I spent all of last week cleaning out in my stamp room, preparing for two friends to work with me on Friday (of last week).  I still have MUCH quilting supplies--cloth, magazines and books, patterns, threads, etc.  I pulled out MOST of the quilting magazines and crafting magazines and am donating them to friends.  Then I moved my stamping magazines (finally) to the bookshelves I had just vacated.  I put away alot of the baskets that were taking up floor space, making it difficult to walk around.  Like usual, I forgot to take a before pictures (not that I'd show that to ANYONE!!) but I did take some "after" pictures.  My stampers are always asking for pictures of my stamp room, so I thought I'd share a few of them.

Here is my work around for guests.  I can seat 4 at this table.
To the right of that table (and seen in the picture above) are some of my containers that hold mostly retired things--designer paper, 12x12 cardstock, punches, etc.  I keep wanting to replace these containers and the arrangement, but haven't so far.

Continuing around to the right is a counter area that was originally built for flower arranging and making wreaths.  I have moved old "pattern" boxes here (left from my sewing days) to hold packs of retired cardstock.  I use those for church projects so I keep them handy. Yes, I have some candy and snacks available to us sitting there, too.  A girl has to have alittle sugar!  On the little table in the foreground is my Zutter cutter that I use for cutting card for class.  It's SO quick!!

 To the right of that area are 3 cabinets.  The first holds mostly retired stamp sets, but also my acrylic paints, etc.  The other two still hold quilting cloth--yes, they are both full.  That will be good stamping storage when I can convince myself to clean them out and donate the cloth.  The two bookcases on the right now hold my stamping books and magazines.
This is a straight on shot of the bookcase/magazines, mostly in magazine holders.  I have samples and ideas in the looseleaf notebooks.
 To the right of the bookcases are double closet doors.  I have a wonderfully large closet in this room, but that's for another day.  Right now, it needs its own cleaning!  Beside the closet doors is an old metal sink I refinished about 15 years ago.  Believe me, this project made me realize that while I enjoy refinishing wood, I do not like refinishing metal.  I have a picture somewhere of how it looked before. You would not believe all the rust.  It was terrible.  I sanded it down to the shiny metal and my husband and I sprayed it white again.  I just LOVE this sink with its two washboards on each side.  Wish I had one like it in my kitchen!  It's wonderful in the craft room for washing out paint brushes, etc.
Beside the sink is an area where I have ribbon and my current Stampin' Up! cardstock stored.  Since my stamping area in in the middle of the room, this is to my back, making it very easy to grab CS as I need it.
The Big Shot sits on this counter, too, along with my current SU stamp sets.  All very handy to me when I need them.
                                      
That takes us back to the table where guests can stamp.
OK, now the middle of the room.  Here is my stamping desk.  No, I didn't get it cleaned off last week.  It became sort of a catch-all for things I needed to put "somewhere."  But at least you can see my stamp pads to the left of my desk.  My current ones are below and the retired ones are above.  I still use those occasionally.
Finally here are some Art Bin containers which are in the middle of the room behind my stamp desk.  I love these Art Bin containers.  These hold current designer paper and projects for my classes as I am designing for them.
Well, there it is--my stamp area, my craft room!  It's not the cleanest, most orderly, but hey, it is a large room and my own space and I do enjoy crafting here!  Thanks for looking at it today.  I have more samples to show later.

Smiles, Laura


Wednesday, October 10, 2012

Double Twisted Easel.....

Today I'm sharing a card I made for my friend Marge's birthday.  I had it made many weeks early, but didn't want to show you until she had received it. This one is called a double twisted easel.  The first card I'm showing here was one I made for my classes to construct.  The one below is Marge's card. 

So, here is the card closed, as you open the envelope and pull it out.
When you "open" the card and stand up the sides, it looks like this. I used the Kindness Matters stamp set on it and punched a bunch of butterflies to include.
This is Marge's card.  Notice the 39 on the front and the question marks?
So opened it looks like this:
We all know Marge is older than 39, but I'll never tell her real age. 

To make this card, you cut your cardstock 5.5 x 8.5”.   On the long edge of the CS, (starting left to right), score at 4.25” and 5.75”.  On SHORT side, cut in at 2.75” until you get to the 5.75” score line.  Then score from the inside end of that cut to the outside corners of the front (see sample).  Fold and glue down the section closest to the card fold line---that part will not open when the card is "opened."  Decorate the card as desired.   It probablly sounds complicated with these instructions, but just look at the card and I think you can figure it out.  Have fun!

Come to visit again soon!
Smiles, Laura 

Monday, October 8, 2012

Cup of Chocolate

I haven't shared with you in over a week.  I've had my sister-in-law Mary Ann visiting and we have been stamping and coloring our 2013 calendars which we always give as Christmas gifts.  She was here from Tuesday - Saturday last week and we got 20 sets each finished---including all the coloring!  Ah, I love to know I have SOMETHING done already for Christmas, because I sure haven't gotten my usual start on Christmas cards!  I need to hustle and get busy on those. I usually make around 160.

I have so much to share with you, but just haven't taken time to photograph any of my cards I've made, and not done the write ups.  So I'll share this card I made a few weeks ago.

This card is Baja Breeze layered with Riding Hood Red (I think).  I embossed the red with the new Argyle embossing folder and love the look.  I used Snow Festival designer paper on this one.

The cup of chocolate is from the Scentsational Season stamp set and cut with the Holiday Collection dies.  I just love this bundle--stamps and dies.
I used the new Window Frames Collection Dies I used for the white the cup is mounted on.  I use these dies ALOT!!

Well, I hope I won't be gone so long, but October is shaping up to be one busy month!  I will try to show you more cards I've made in a couple of days.

Thanks for stopping by today!  Smiles, Laura