Saturday, June 29, 2013

Honeycomb Card....


I saw this card by Kim Singdahisen on Pinterest and loved it---but I felt it was missing something.  A bee, right!  We just happen to have a new bee in the Backyard Basics stamp set by Stampin' Up! so I wanted to make Kim's card but with a couple of changes.
Here is the card I made.  I used Basic Black and Crushed Curry for my cardstock, so it's a bit darker than Kim's.  (Or maybe her lighting is better than mine.)  I punched hexagons out of black, white and curry to go on my front.  I used the Six Sided Sampler stamp set for the sentiment.
I decided the black ones needed to be embossed with the Honeycomb embossing folder.  (Kim has circles on hers.)  I liked how those looked.  Here is a shot I had to put some light on so you could see the impressions on the black.
 The little bee was stamped in black and colored using the new Smoky Slate marker and the Crushed Curry re-inker and my aqua painter.  I cut the bee out using the Backyard Basics framelit set.  I love the bee on here!

 I have so many more ideas for using the Hexagon punch and stamp set.  You'll be seeing more...
Smiles, Laura


Friday, June 28, 2013

Welcome, Fritzie....

I have a new "downline" with Stampin' Up!  Fritzie Wise signed up at the end of May and I am so looking forward to working with her.  I hope I can bee a great "upline" to Fritzie.  Welcome to my team, Fritzie!


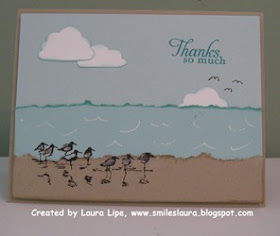
I wanted to send Fritzie a card to thank her for signing up under me.  Here is the card I made for her.  I used the new Wetlands stamp set.  I suppose it's a strange stamp choice for a "mountain girl" but I just love these little sandpipers.  I used Soft Sky, Pool Party, and Crumb Cake for the card.

I used the white gel pen to make some waves in the ocean.  And I punched the "clouds" using the Build a Cupcake punch.  I hope Fritzie liked it!

Thanks for stopping by my blog today!!  Smiles, Laura

Wednesday, June 26, 2013

Fold-Up Card How-to....

I had a couple of you ask how to make the Fold-Up Card I showed you in my recent post, so I thought I'd explain how to make it.  Here is the card we are talking about:

For the card, you will need:
One 8" x 12" pc. of cardstock
Two 3-5/8" squares of designer paper for fronts and inside fronts
Four 1-3/4" x 3-3/4" rectangles of designer paper for the top and bottom flaps
One 3-3/4" square of vanilla or white CS for sentiment inside.
Decorations for your front.

Here is a tutorial in pictures:


Cut four 1-3/4" x 3-3/4" rectangles of designer paper and adhere them to the fronts and insides of the top and bottom flaps, the ones that fold in over the center.  (No picture to go with this step, but you can see them decorated in the picture below.)
I made two cards while making the tutorial.  On one, I cut the center section too wide and my two triangle sides folded in did not meet, so I added this little scalloped piece to the side.  I also used striped paper inside this one as I was running short of the print paper.  Here is one card, front and inside.


Here is the front of the second card.   When attaching your front decoration, be sure not to put adhesive on the entire back of it.  It adheres to one side and overlaps the other side.  If you have adhesive on the whole back of your decoration, it will stick on both sides and you will not be able to open the card.

 Inside:
I hope these pictures will help you make your own Fold-Up Card.  If you still have questions, leave a comment and I'll answer them.   Have fun with this one!!
Smiles, Laura

Tuesday, June 25, 2013

Georgia's Retiring!! Yeah!!

One of my friends and fellow stamper Georgia is retiring at the end of June (Hi, Georgia!!).  I wanted to make her a card to wish her well as she begins this next phrase of her life. 

Retirement is so much fun!  You can sleep late, drink coffee and watch Good Morning America, and never worry about the snow or darkness outside!  Ah, it's GREAT!  And all those good feelings are before 6:00 a.m. with more to go that rest of the day.  Ha!  (Notice I said 6:00 is sleeping late because I used to have to get up at 4:15 to be AT WORK by 6:00 a.m.)

Anyway, I saw this lady at the spa on a card somewhere and the bathtub on a different card somewhere and decided Georgia's card must have both of them.  She deserves a great day at the spa---or at least relaxing at home!!
 Here is a closeup of the lady getting the facial and the sentiment:  Let the relaxation begin!  Happy Retirement!   This little stamp was from a hostess set years ago and I've saved the set because I love some of the little sayings in it.
Georgia, I hope soon your working days are just a distance memory, a means to providing your living during retirement!! Ha!  Congratulations for all the hard working years.  Let the relaxation begin!!!!
Smiles, Laura

Grieving for Tiger.....

We got bad news last week.  My dad's little cat Tiger (only 4 years old) was mortally wounded and had to be put down.  We think a coyote got him and tore out part of his tummy.  Tiger made it back to the house, thankfully, so we'd know what happened.  Dad said, "He always comes home to me."  Dad was so very upset and sad about this loss.  We were all so sad, because Dad lives alone and Tiger was such company for him.  I don't think I had a single phone conversation with Dad where he didn't mention Tiger--sitting in his lap, bringing in a "gift" in the house to him, something.  Dad will be very lonesome without Tiger.  Hopefully he will feel like getting another cat to live with him.

Hubby and I spent the first two days with Dad, but when we had to come home, I wanted to make him a card to express our sympathy.  Here is the one I made.  I had to use retired stamps but Dad won't mind.

The cat in this stamp is solid, so I used a marker to add stripes to he would look like Tiger.  And of course my cardstock colors were shades of yellow/gold just like Tiger.
I won't share the inside of the card because I wrote a personal message to Dad before I snapped a shot, but I also had a different "Tiger" stamp inside the card.  I hope it brought Dad some degree of comfort.  Love you, Dad!!

Teary smiles, Laura

Friday, June 21, 2013

Fold-up card.....

We made this card (this layout, each person made their own color and design) at Smudge Bunch (stamp club) the other night and I love how it folds up!  Friend Janet led us through the construction of the layout.  
 This top part folds down and the bottom folds up, to meet in the middle.  The front (both sides) is cut into triangles, that meet in the center to make the square.
 Here is a picture of each piece folded outward.
I like how you start with a 12" x 12" piece of  cardstock and end up with a 4" square card.  Neat!!
Thanks for stopping by today.
Smiles, Laura

Tuesday, June 18, 2013

Watercolor scene....

The card I'm sharing today was made for my friend Pam and has almost NO stamping on it---except the sentiment from the Thoughts and Prayers stamp set by Stampin' Up!  I'm telling you, that is such a "go-to" set!!  I used it ALOT.  If you do not have that one, you should get it!!

I did use Stampin' Up! watercolor paper for the front of the card, using my aqua painter and stamp pads to color in the sky , ocean and beach.  I hope you can tell that's what the picture is about.
I used Pool Party cardstock for the card, layered with Soft Suede, and topped with the watercolor pictures.  The card is not grand, but the feelings behind it for friend Pam are very grand (large, huge).

Please pray for Pam as she and her doctors work to heal her!
Smiles, Laura


Saturday, June 15, 2013

Get Well Soon...

 My friend Susan broke her foot the other day and I wanted to make her a card.  I saw this little foot cast card on Pinterest when I was researching a card to make for my sister when her knee was operated on.  I saved this one because it was so cute.

I decided to make it for Susan.  She's so "girly" that I wanted it in some neat, soft colors.  I used Calypso Coral for the card, layered with white, then layered with Coral again, then topped with white. For the foot/ankle, I used the old retired Stocking punch and punched a cast out of Blushing Bride.  Of course the cast couldn't be white!!! It had to look girly.  I embossed it using the Square Lattice embossing folder.  I did line the cast with white like the cotton batting doctors use.  Of course, I had to put polish on the toes!!  Susan's girly.  Ha!

The sentiment is from Delightful Dozen.

I hope she likes it.  I thought it turned out pretty cute.  Heal quickly, Susan!!
Smiles, Laura

Tuesday, June 11, 2013

Flip Down Stack Fathers Day card....

Yes, Fathers Day is coming and I have already shared some cards I made for Fathers Day.  Today I wanted to share one more I made recently.  On March 19, I shared a Flip Down Stack card with you that I made for Easter.  Well, this one today is also a Flip Down Stack card, made for Fathers Day.

Here is the front of the card.  Actually, the front does not open because all the images and sentiments are on the flip down squares. I used Soft Suede and Sahara Sand for this card.  The animals are from the Zoo Review set by Stampin ' Up!  The sentiments are from other various sets.
 When you flip the first stack down, here is what you see.
 And when you make the final flip down, you see these last two squares.
This one will be for my dad and my husband for Fathers Day.  I hope they like it.  Always fun to have something alittle interactive for men!!

Thanks for stopping by today.  Come back soon!
Smiles, Laura

Saturday, June 8, 2013

New Baby....

Some friend of our recently had a new grandson and I wanted to make them a special card.  I had seen several lions on cards and wanted to make a lion, but I wanted this one to be in baby colors.  Here is what I came up with:
Isn't he cute!!  I used the Floral Frames Collection by Stampin' Up! for the two mane sizes.  One is cut from Coastal Cabana cardstock and the dotted layer is using Pool Party Patterns designer series paper, which has now retired.  I used circle punches for his nose, muzzle and ears.  He is mounted on a Pool Party card, cut 4"x4."

Inside, I put, "No 'lion,' we are thrilled about the birth of your new grandson."

I hope they liked the card.  I thought he was a cute little fellow!
Smiles, Laura

Wednesday, June 5, 2013

More Lever cards....

I don't know why, but I can't stop making Leverl cards.  I just love how they open out.  Such fun to see.  I told you back in April how to make these and my tutorial is available through the Splitcoaststampers site. 

Here are a few more cards I made with this layout:


Aren't they fun!  Yes, they are alot alike, all using the Simply Sketched hostess set in the new Stampin' Up! catalog, and some of the same other stamps, but still I love all the different designer papers and just had to show you.  So while I haven't made alot of diferent layouts/techniques lately, I have been having fun making some cards. 

Thanks for stopping by today.  See you again soon, I hope!!
Smiles, Laura

Sunday, June 2, 2013

Making Chevrons...

I saw a great tutorial for making chevrons on Splitcoaststampers the other day and just have to play with some.  Here are a some cards I made with chevrons on them:

Here is my original card I designed for a class.  It uses three different teal colors:  Bermuda Bay, the new Coastal Cabana, and Soft Sky (or maybe I used Pool Party--can't remember).  Love these soft colros together!!
To make the chevrons (which really look like rick-rack to me) you cut a strip of cardstock 1" wide by 5.5" long.  Score it lengthwise down the middle.  Then score it crosswise every 1/2".  Cut from the bottom corner to the middle scoreline, to create “V’s”, removing paper scraps the entire width of the CS.  Rotate paper 180 degrees and cut the opposite triangles.  Easy to do while sitting and listening to TV.  Ha! 

Here is a card I made without the sentiment label, but with the sentiment just stamped on the front, so I could use 4 different colors of chevrons.

 For this card, I decided I wanted the image to go over the top of the chevrons.  The flowers are from the Summer Silhouettes stamp set.  The cardstock is the new Crisp Cantaloupe, Coastal Cabana, and Bermuda Bay.
 For this card, I decided to cut the chevrons in smaller pieces, so that they actually look like chevrons, rather than ric-rack.
 I hope you are inspired to make some of your own chevrons.  Have fun!!  And visit again soon!
Smiles, Laura