Wednesday, March 30, 2011

Crazy for Cupcakes....

I promised to share another card using the same layout I showed you yesterday.  Well, here it is.  I love doing that--finding one layout that works for me and seeing what other colors and patterns I can use for it.

This one uses the same tilted layer on top, but it is a birthday card.  I used the Crazy for Cupcakes stamp for the main image.  And I used the Occasional Quotes set for the sentiment.
The designer paper on this one is from the Celebrations collection.  Some neat, bright patterns in that one. 

Thanks for stopping in today.  Hope to see you again!! Smiles, Laura

Tuesday, March 29, 2011

Sew Suite

Today's card uses the Sew suite set again.  I've shown you several cards using this set.  Since sewing used to be my passion before I found stamping, I'm kind of partial to this set.  I think there are so many ways to use it.

For this one, I decided to tilt the top layer a bit, just give the card some interest.  The designer paper is from the Springtime Vintage collection.  It's so nice and delicate.  I used Always Artichoke for the card itself. 
                            
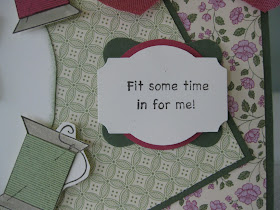
 The ribbon is the Rose Red 1/2" seam binding ribbon---also ver delicate.  The sentiment, shown below, is another stamp that I had Stampin' Up! personalize for me.  It probably should have read, "Fit in some time for me!"  I debated back and forth about it.  Oh, well, the recipient will know what I mean!!
Tomorrow I'll show you another card using this same layout.  Come back then!  Smiles, Laura

Monday, March 28, 2011

Gabby and Chelsea and their toys....

I kept Gabby's sister Chelsea last week while her "mom" and "dad" were on vacation.  Let me tell you, these two girls had a ball running around and playing.  Since we live on acreage, they can free-range and run in the woods and just have fun---and they did.  Chelsea is a "chew-er".  She came on Friday evening and by Saturday had totally demolished the toy her mom brought for her (a new one when she arrived) and a couple of Gabby's toys.  So I went to Pet Smart on Wednesday and brought them both a monkey--Gabby's is green and Chelsea's is pink.  Well, wouldn't you know it--Gabby liked Chelsea's and Chelsea liked Gabby's.  Here is Gabby with Chelsea's pink monkey.  Notice the missing arm?  Gabby didn't do it and this look on her face says:  "I'm NOT the guilty party!! I'm not even touching it!"
Here is Chelsea with Gabby's toy, ready to chow down.
Here they are, each with their own toys.
This is how they liked to run around the house with their toys.
It was so funny to see the legs, arms (those that were left) and tails dangling as they ran from room to room with these monkeys, squeaking all the while. (Yes, the squeakers still work so far.)
Saturday night when it was time for Chelsea to go home, I could tell that they each wanted the ones they wanted---not the colors I wanted them to have.  So I sent the green monkey home with Chelsea.  I had such a great time with these two little sisters!!  I'm glad they get to "go to camp" at each others homes when the "humans" have to be away!!
Smiles, Laura

Sweet Summer---were will you go?

This card uses the Sale-a-bration (SAB) set, Sweet Summer, and I am sure going to miss it when it's gone!!  Stampin' Up! has told us that SAB sets will never make it into the big catalog, so I know we are loosing this one at the end of March.  I just LOVE it and have enjoyed using it on my cards!! I'll keep using it, but hate that I cannot interest others in buying it.

For this card, I used Concord Crush, one of the In Colors this year.  I have a strip of Lap of Luxury designer paper on the front, and since it uses Pretty In Pink in the designer paper, I used it as another color on the card.

Can you tell the card is not as wide as a normal card?  Well, I cut 3/4" off the right side of the card, so allow the Top Note to hang over.  If you do this, be sure to measure and don't let it extend beyond 4-1/4" so it will still fit into your envelope.

I stamped the branch and flowers in Concord.  I colored the flowers with the Pretty in Pink marker and the leaves with the Always Artichoke marker.
 I wanted to highlight the oval.  That oval is from our Ovals #2 die.  You KNOW we don't have a scalloped oval to layer under it, right?  Well, I punched two Concord scalloped circles using the 2-3/8" Scallop Circle Extra-large Punch.  One of those I cut in half and mounted at the top and bottom in the back of the oval.  The other scallop circle, I cut in half and the took 3 scallops from each half and mounted that between the top and bottom scallop circle.  It fits perfectly and LOOKS like a layered solid scallop oval!  Love it!!
Those little flowers on the side of the Top Note are the Bitty Buttons, with Pretty in Pink layered behind them.  And the sentiment, "You make life sweeter!" is a stamp I had SU make for me.  I love how you can have personalized stamps made with the sentiment of your choice.  I've had several made recently.

Thanks for visiting today!! Hope to see you again soon!!  Smiles, Laura

Saturday, March 26, 2011

Eastern Blooms

Here is a card I made recently that I wanted to share today.  It uses the Sahara Sand as the card color, with layers of Not Quite Navy and Marina Mist.  I added Rick Razzleberry for interest. 
                                      
The two panels on the front were run through the Square Lattice embossing folder to give it some texture.  Love it!!  I think the 3 little 1/8" ribbons wrapped around the front are a hit, don't you?  If you haven't started using these smaller ribbons, you should try them!!

 Of interest on this card is the flower.  Using my stamp-a-ma-jig, I stamped the same flower from Eastern Blooms onto three  pieces of vanilla cardstock, add the same size, using Razzleberry, Marina Mist and Not Quite Navy.  Then I tore two of the flowers so that I could layer some of each color onto the Marina Mist one.  I have Razzleberry on two sides.  I think this adds more interest than just having one colored flower.
I want to show you one more thing about the card.  Notice the label I stamped Hello onto?  Well that's one END of the Decorative Label Punch.  Yes, I punched out one Decorative Label, then put one end of it back into the punch just a bit and punched again.  I wish I had taken a shot of it in the punch, but hope you can figure it out.  Makes a neat little label for just one word like this.  (That's "Hello" from the Tiny Teacup set.)              
                                       
Hope this one has inspired you today!!  Thanks for stopping by.  Smiles, Laura

Friday, March 25, 2011

Happy Anniversary, Lee and Margaret

Yes, we are celebrating another anniversary this month--this one for our friends Lee and Margaret.  They seem to enjoy my cards, so yesterday I made them a special one for their anniversary.

This one uses the Lattice die, but cut in two long pieces for the left side of the card.  The card itself is Soft Suede with a Bashful Blue layer.  I just be into these colors for aniversary cards (see my last entry with the same colors!)

I used the One-Step Bird punch to make these two bluebirds.  I'm telling you, spring is here and the birds are really starting to sing and fly around our house, so I wanted this spring anniversary card to have two birds on it.  I love how most birds mate for life---Lee and Margaret are celebrating their 42nd anniversary--so another reason to have birds on the card!
 Again the sentiment on this card is from the Occasional Quotes Level 3 hostess set.  There are so many nice sentiments in that set!!
I hope Lee and Margaret have another perfect year together!!  Our best wishes to them!!
Smiles, Laura

Wednesday, March 23, 2011

Happy Anniversary, Dad and Ruth

My dad and his wife recently celebrated their 29th wedding anniversary.  We are so happy for them, because Ruth is in failing health and we are happy for every day they have together.  I wanted to make them a card they both would enjoy.  Here is what I came up with.

The card is Soft Suede with Bashful Blue matting and Whisper White card stront.  I ran the white through my Elegant Lines embossing folder.  I added pearl "jewels" on several of the circles on the embossed piece.
 I used the Decorative Label Punch for the sentiment from the Occasional Quotes Level 3 hostess set.  Again more layering for the label.
My dad called to thank me for remembering their day with such a pretty card.  I'm glad they liked it!!
Smiles, Laura

Tuesday, March 22, 2011

Another Tri-Steps Card

On March 8, I shared with you a Tri-Steps card and it was a hit.  Today I wanted to share another card using this same fold.  This one uses Marina Mist as the card base and I used White, Daffodil Delight and Mambo Melon with it.  It was afraid it was a bit gaudy, but several girls who saw it said it was one of their favorites!  So, I'm showing you today. 

For the center of the card, I cut a 3" square and punched each side using my Dotted Scallop Ribbon Border punch.  I made more of these punched "ribbons" in the Melon and glued those behind my Daffodil ones. 
                                  
Here is a close-up of the sentiment.  It's a Scallop Oval mounted onto a 1-3/8" circle, and layered with a large oval.  Those little flowers on it and on each corner are made with one of the Itty Bitty Shapes Punch Pack punches.
Here is a close-up of the middle of the front.  That's the teacup from Tiny Teacup.  I cut the "Hello" from under it so I can use both stamps independent of each other.  How do you like the tiny pearl "jewels" on the teacup?  The teacup stamp is dotted so I thought the pearls would be a nice touch.
 Now for the inside of the card.  Again, I punched a 3" square using the Ribbon Border punch.  I used designer paper from  the Brights and Subtles Patterns DSP Stacks.
 In this shot, yoou can see the stairsteps. 
I am not goinng to take space to show the instructions for this card again.  You can find them on my March 8 entry.  Good luck making your own!!

Thanks for stopping in today!!  Smiles, Laura

Friday, March 18, 2011

St. Patrick's Day card inspiration.....

Isn't this a great card!!  It was my St. Patrick's Day swap from my friend Rose Kerry, and she has agreed to be my guest artist today.  Rose always had the most detail on her cards and this one is no exception!  Look at the layers! 
Here is a close-up of her detail.
                          
I wanted you to see the piercing in the photo corners.  And Rose popped up the shamrocks and their circles using dimensionals.  Rose used the Lucky Shamrock stamp from the Occasions Mini and "Good Luck" from the So Happy For You Sale-a-bration stamp set.

This is a great layout and it prompted me to make one of my own--not a St. Patrick's Day card, but just a card using the layout.  Here is what I came up with.
I have two layers of photo corners in two colors, but did not pierce mine.  And I used flowers on the right.  Here is a close-up of them.
I put silver brads in the cebnters. 

For my card I used Not Quite Navy, with Sahara Sand, and marina Mist and a bit of Crumb Cake.  The designer paper is from the Blueberry Crisp pack.
My sentiments are from the On a Pedestal and Birthday Bliss sets.

I love taking a card I love, like Rose's, and trying to come up with the same layout, in a different theme and colors.  Thanks to Rose for allowing me to share her beautiful creation.
Smiles, Laura

Thursday, March 17, 2011

St. Patrick Day card....

Today I wanted to share with you another St. Patrick's Day card I made recently.  The card itself is Wild Wasabi green with a layer of Certainly Celery on that.  This one uses the mug from the Cheers to You stamp set and the shamrock from the So Happy for You Sale-a-bration set, stamped in Wasabi on the Celery cardstock.   I colored the mugs with my So Saffrom marker, so look like "beer" in the glass.  I  colored the "foam" on top with my white gel pen. 
For the tag, I punched with the Decoration Label Punch from Wasabi, from Celery using the Curly Label punch, from So Saffron using the 1-3/8" circle punch, and finally from white with the lLarge Oval Punch.  I stamped the Happy St. Patrick's Day using Wasabi ink.  The ribbon is Certainly Celery. 
His one will go to my son, whose middle name is Patrick!   Have a great day and don't party too hardy!!
Smiles, Laura

Tuesday, March 15, 2011

Welcome, Izzy....

I have a new granddog.  Her name is Izzy (Isabelle Chevelle) and she's about 8-1/2 weeks old.  My son and his wife are totally taken with her and she is a CUTIE. 
She's half pit bull and half bull dog and she's probably going to be a pretty hefty girl. 
Here she is on her first walk outside on her leash.  They want to socialize her so she is a "good girl"  I bought her the first "bed" ---let's hope she doesn't chew it up.  I wanted to send them a "welcome baby" card, so here's what I made for them.
You know I love punch art, so I had do try to make a dog that looks like Izzy.  I guess my head isn't long enough, but I tried to get the hanging jaws she'll have especially as she gets older. 
I used the heart punch for her face and the 3/4" circle punch for the ears.  Her eyes are black brads. and the tongue is a circle from the 2-Step Owl punch.  Inside I stamped "Welcome Baby" and wrote Izzy after that.

I hope they like the card when they see it today!  We will be seeing alot more of Izzy, I think!
Smiles, Laura

Monday, March 14, 2011

Leprachaun.....

I've shared this Funky Folds card with the little Leprachaun on some of my yahoo groups and am getting requests to put him here on my blog and show how he's done.  I made this card for friend Rose as my swap in a St. Patrick's Day challenge.  I got inspriation from Ellen Kemper and Samantha Parisi from their leprachauns.  Rose always compliments me on my punch art so I thought I'd make this fellow for her.  She seemed to like him!

OK, so first I'll tell you how the leprachaun is made.
           
I used the following punches for various parts of him:
Head: Ornament punch
Hair:  Scallop Circle punch, cut in half
Mustache:  5-Petal Flower punch
Hat:  Word Window and 1-1/4" circle punches
Body:  Wide Oval punch
Arms:  Large oval punch
Belt:  Word Window and Slot punches
Boots and Shamrock:  Heart to heart Punch
Legs:  Large Oval Punch
Nose, eyes,and ears:  1/4" circle punch
Outer eye:  2-step Owl Punch

Here is a picture of the card opened up:
This is called a Funky Folds card and I've posted instructions for making it before, but here they are again:
I hope you can figure out how to cut and score the card from this picture.  You can scroll back in my entries and see other cards made using this layout.  This is really a fun card!  I hope you all enjoy him!

Smiles, Laura

Two more twisted easel cards.....

I don't think I've shared this little love bug with you.  I made this one for Jessica's Valentine.  She just loved him.  I saw him on Creations on Paper blog and fell in love with him.  He wasn't on a card, but I knew he'd be perfect for an easel card.
I gave you the directions for an easel card yesterday so I'll tell you want punches I used to create the cute love bug:
Back--1-3/4" circle
Belly--Large and small oval punches
Arms and Legs--small oval punch
Feet--1/2" circle punch
Mouth (top and bottom)--3/4"x15/16" oval punch carried over from Holiday mini
Tongue--3/4" circle punch (I think)
Eye balls--3/4" circle punch
Eye --1/4" circle punch
Top of head--small oval punch
Antenna--large oval punch
ends of antenna--1/4" circle punch
I hope you can figure him out and make one yourself!

Here is the inside of the card:
I used the Red glimmer cardstock for the hearts.

Here is another card I made for Valentines in the same easel layout.

And here is the inside:

I made this one for my friend Judy's husband to give her for Valentines Day. 

See there are so many ways to use this twisted easel card.  Enjoy!!!   Smiles, Laura

Sunday, March 13, 2011

One last Petal Pizzazz.....Twisted Easel....

OK, I admit I've been showing you alot of Petal Pizzazz and with the same flower from the set.  There are several flowers (five of them, I think) in the set and I've been leaning heavily on this one flower.  I promise to use some of the others to show you in the future.  But honestly, you could do the cards I'm showing you with any of the flowers. 

This card is called a twisted easel.  Here is the front of the card.
When you open the card, here is how it looks:
The card itself starts out as a 8-1/2" x 4-1/4" card, folded in half to make a 4-1/2"x4-1/2" card.  Put the fold on the left side and then score from the lower left of the front near the fold to the upper right corner.  This made the fold where the card props open. 

This card is Poppy Parade and I have poppy and Peach Parfait flowers on the front.  Some ladies are putting a full sheet on the front which covered up the nice triangle.  I put a small sheet with my flowers so that my triangle shows.  I like that.  The designer paper used on this one is from the Patterns Paper Stack in the In Colors.

This card looks complicated, but is really an easy one to make.  Try it and see how you like it!
Thanks for visiting today.  Smiles, Laura

Saturday, March 12, 2011

On a Petal Pizzazz roll.....

I guess you'd say I'm on a Petal Pizzaz roll---and I seem to be using the same flower in that set on my cards.  But I have these samples so I cant to show you.  I like to show my customers more than one card using a stamp set, especially an expensive set like this one, so they will have lots of ways to use it.  Here  is a card where I used Tangerine Tango, Daffodil Delight, and Rich Razzleberry for the flowers and also for the scalloped cardstock. 
The card itself is white and I tied a Rich Razzleberry ribbon around the card.  I stamped "sweet friend" from the Hello You stamp set.  I am not sure if you can see it, but those are Pearl Jewels in the center of each flower.

Here is another card I made with the set:
This card is Marina Mist, and I used Tangerine Tango, Daffodil Delight and Marina Mist for the flowers.  Again, I used the Hello You stamp set on this one. 

There are so many ways to use this stamp set.  I have one more to show you on my next entry.  Come back again, OK?  Smiles, Laura

Thursday, March 10, 2011

More Petal Pizzazz.....

Today I wanted to show you a card we made in my class this week which uses the Petal Pizzazz.  Did I say I LOVE this set??  I do!

The card is Pear Pizzazz and I used designer paper from Sunny Garden on it.  What happy paper that is!

I stamped one of the flowers from the Petal Pizzazz set in Peach Parfait, Daffodil Delight, and Poppy Parade. I punched them out with the Scallop Circle punch.   The leaves are from the same set and are stamped in Pear Pizzazz.
                      
For the center, I used the Scallop Circles #2 to cut the Whisper White cardstock.  I stamped "Hello, You" from the Hello You set in Poppy Parade.
Here is a close up of the flowers and sentiment.  I put a Rhinestone Jewel in the center of each flower.  I think this makes a happy card, suitable for almost any occasion.

Last August I made this card (below) using designer paper that has now retired.
I love the colors in it, too---Tempting Turquoises, Pumpkin Pie and Rose Red.  I didn't get to demo this card before the designer paper retired.  I show it to you because it demonstrates that you can use almost any colors for this card!

Thanks for stopping by today.  Smiles, Laura

Tuesday, March 8, 2011

Tri-Steps Card....

Today I'm going to share with you a card made with a layout that came from Pat Huntoon's Technique Junkies Techniques CD.  I made this one with our stamping club last night and I think everyone enjoyed having a new cut and fold to learn.  Here is my front.  I used Peach Parfait, Poppy Parade, and So Saffron  for the cardstock.  That's Sunny Garden dotted designer paper on the front.  The flowers are from the Petal Pizzazz stamp set.  Love that one!!!  And the sentiment is from the Upsy Daisy stamp set.  I used the scallop circle punch to punch out the flowers, and put a rhinestone Jewel in the center of each.
 Here is the insdie.  I decorated the left half of the inside with So Saffron cardstock and left the right half plain.
 In this shot (below) you can see the 3 steps, hence the name, Tri-Steps.  I lined each one with striped desiger paper so they show up well.
 Here is another card I made using the same cuts and folds (and don't worry, I have directions below).  I used the stamp set Great Friend on this one--the butterfly and the sentiment.
 Here is the inside of the second card.  I lined the left and right sides of the inside with designer paper and I put punched butterflies on the steps.
NOW, I know you've been wating---here is how you make this card.  I have tried to explain with words (not just the drawing) how to do the cuts and scores.  So please start on the left and follow the directions.  The beginning cardstock size is 5" x 10".  I do not have it on the written instructions, but you need to score on the LONG wide at 4" to make the front of the card fold over.  Then go ahead with the instructions for cutting and scoring the rest of the card.
Let me know if you run into trouble with this one and I'll try to help.  Tomorrow I'll share another card made with this same layout/technique.

Thanks for visiting today!!  Smiles, Laura